
If your refrigerator ice maker stopped working, the most likely causes are a turned-off ice maker switch, a frozen or kinked water supply line, a clogged water filter, a faulty water inlet valve, or incorrect freezer temperature settings. Most of these issues can be diagnosed and fixed at home without calling a technician, often within 30 minutes. If the problem continues after checking these common causes, professional appliance repair may be helpful for diagnosing and resolving more complicated issues.
What Happens When Appliances Break Down in Oshawa Homes
When appliances break down in Oshawa homes, daily routines can quickly get disrupted, from spoiled food due to a faulty refrigerator to laundry delays caused by a broken washing machine. In such situations, it’s important to rely on trusted appliance repair services in Oshawa for fast solutions. Whether you need fridge repair Oshawa, washing machine repair, or emergency appliance repair near you, professional technicians can quickly diagnose and fix the issue, helping restore comfort and convenience to your home without long delays.
Why Did My Ice Maker Suddenly Stop Working?
One day everything is fine, and the next morning you push your glass against the dispenser and nothing happens. It is one of the most common and genuinely frustrating appliance problems homeowners face. The good news is that in the majority of cases, the root cause is something straightforward. Understanding how the ice making cycle works makes the whole process much easier to diagnose.
Your refrigerator ice maker works through a timed sequence. A water valve opens, fills a mold with water, the freezer temperature brings that water to a frozen state, a heating element loosens the cubes, and a motor with rotating ejector arms pushes them into the storage bin. A shut-off arm or sensor then pauses the cycle when the bin is full. Any one of these components failing can bring the entire process to a halt.
Most Common Reasons an Ice Maker Stops Working
Before diving deep into each issue, here is a quick reference of the most frequent culprits:
The ice maker is accidentally turned off or paused. The freezer temperature is set too high, above 5 degrees Fahrenheit. The water supply line is frozen, kinked, or blocked. The water filter is clogged and restricting flow. The water inlet valve has failed or is receiving low water pressure. The ice bin is overfilled or the shut-off arm is stuck in the up position. The ice maker assembly itself has a mechanical or electrical fault.
Step 1: Check If the Ice Maker Is Actually Turned On
This sounds almost too simple, but it is the first thing any experienced appliance repair professional checks. Many modern refrigerators, including popular brands like Samsung, LG, Whirlpool, GE, and Frigidaire, have a dedicated on/off switch, a control arm, or a digital toggle inside the freezer compartment.
On older models, a wire shut-off arm sits beside the ice maker. When this arm is lifted into the up position, ice production pauses completely. Someone reaching into the freezer for something could have accidentally lifted it. Push it back down and wait a few hours to see if production resumes.
On newer smart refrigerators with digital controls, go into the settings menu and confirm the ice maker function is enabled. Some models also have a “vacation mode” or “sabbath mode” that disables non-essential features including ice production.
Step 2: Verify Your Freezer Temperature
Freezer temperature is one of the most overlooked causes of ice maker failure. If your freezer is not cold enough, the water in the mold will not freeze properly, and the thermostat sensor will never trigger the ejection cycle.
The recommended freezer temperature for reliable ice production is between 0 and 5 degrees Fahrenheit, which is roughly negative 15 to negative 18 degrees Celsius. If your freezer is sitting at 10 degrees or higher, ice production will slow dramatically or stop altogether.
Use a standalone appliance thermometer placed in the middle of the freezer for the most accurate reading. Do not rely solely on the digital display, as these can sometimes be off by several degrees. If the temperature is too high, lower the thermostat setting and give it 24 hours to stabilize before testing the ice maker again.
One important note: if the freezer temperature is set excessively low, the water may freeze inside the supply line before it even reaches the mold. Finding that sweet spot in the 0 to 5 degree Fahrenheit range is the target.
Step 3: Inspect the Water Supply Line
The water supply line is a small, often plastic or copper tube that runs from your home’s water connection behind the refrigerator to the ice maker. This line is one of the most frequent failure points, and there are two main problems it develops.
Frozen Water Line
A frozen fill tube is extremely common, especially in refrigerators where the freezer temperature fluctuates or where the refrigerator is pushed too close to the wall and airflow becomes restricted. You can often identify this problem by hearing the ice maker cycle through its process but producing no ice whatsoever.
To thaw a frozen water line, first unplug the refrigerator and turn off the water supply valve behind the unit. Then use a hairdryer on a low heat setting to gently warm the fill tube area near the back of the freezer compartment. Never use an open flame or high heat source, as this can damage the plastic tubing and wiring nearby. Once thawed, check whether the tube is also cracked or damaged.
Kinked or Pinched Water Line
If the refrigerator has been recently moved or pushed back too far against the wall, the flexible water supply line can develop a kink that restricts or completely blocks water flow. Pull the refrigerator away from the wall and visually inspect the entire length of the tubing. Any bend or crimp should be gently straightened. If the kink has been there for a while, the tubing may have developed a permanent crease, and replacement is the better option.
Also check that the water shut-off valve behind the refrigerator is fully open and not partially closed from a previous repair or a bump.
Step 4: Replace a Clogged Water Filter
A clogged water filter is arguably the single most common reason a refrigerator ice maker stops making ice, and it is also the easiest fix. The water filter in your refrigerator is designed to remove sediment, chlorine, and other contaminants from the water that flows to both the ice maker and the door dispenser.
Over time, particulates accumulate in the filter media. When it becomes too restricted, water pressure drops below the threshold needed to fill the ice mold correctly. The general recommendation from manufacturers including Whirlpool, Samsung, and LG is to replace the water filter every six months.
Signs that your filter is overdue for replacement include slow water flow from the door dispenser, ice cubes that are smaller than usual or hollow in the center, water or ice that has an off taste or unusual odor, and of course, reduced or zero ice production.
To replace the filter, locate it either in the upper right corner of the refrigerator compartment, in the base grille at the bottom of the unit, or inside the door depending on your model. Twist and pull the old filter out, push the new one in until it clicks, and run about two gallons of water through the dispenser to flush the new filter before using the ice.
Step 5: Check the Water Inlet Valve
The water inlet valve is an electrically operated solenoid valve that opens when the ice maker calls for water and closes when the mold is full. It requires a minimum water pressure of 20 psi to function correctly. Below that threshold, the valve cannot open properly, and the ice maker receives little to no water.
There are two main ways this valve fails. First, the solenoid coil can burn out electrically, meaning the valve physically cannot open even when it receives the correct signal. Second, mineral deposits and sediment can clog the small screen inside the valve, restricting flow without a complete electrical failure.
To test whether water pressure is the issue, disconnect the water line from the inlet valve and hold it over a bucket while briefly turning the water supply back on. If you get a strong, steady stream, pressure is probably fine. If it is a trickle, you may have a plumbing pressure issue or a blocked valve screen.
A failed inlet valve should be replaced rather than repaired. The part is available at most appliance parts stores and is model-specific, so have your refrigerator’s model number ready. This is a moderately straightforward DIY repair for someone comfortable working with plumbing connections and unplugging appliances safely.
Step 6: Look at the Ice Maker Control Arm and Sensor
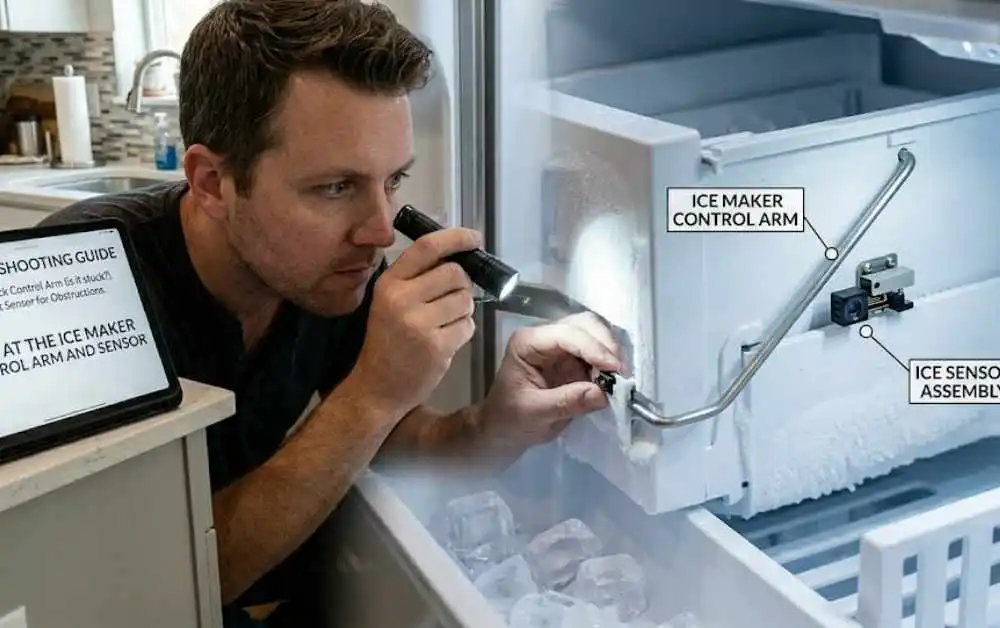
Many ice makers use a mechanical shut-off arm, a wire rod that rises as the ice bin fills and cuts off production when it reaches the top position. If this arm is stuck in the raised position due to an ice chunk pushing it up, or because someone accidentally lifted it while grabbing ice, the ice maker will think the bin is already full and stop working.
Remove the ice bin, clear any built-up ice or frost around the arm mechanism, and reset it to the lowered position. Then replace the bin and give the system a few hours to restart production.
Newer refrigerators use an infrared sensor or optical sensor instead of a mechanical arm. If this sensor becomes dirty or is blocked by frost buildup, it may falsely detect a full bin. Wiping the sensor area with a dry cloth and clearing any frost around it often resolves the issue.
Step 7: Defrost the Ice Maker Assembly
If ice has accumulated excessively inside the ice maker housing itself, around the mold, or along the ejector mechanism, the whole assembly can seize up. This situation, sometimes called ice dam formation, prevents the ejector arms from rotating and stops the cycle entirely.
The most effective solution is a manual defrost. Unplug the refrigerator and leave the freezer door open for several hours, or use a hairdryer on a low setting to carefully melt any visible ice buildup around the ice maker module. Once the assembly is clear and dry, plug the refrigerator back in, wait for the freezer to reach proper temperature, and test the ice maker.
Step 8: Reset the Ice Maker
A soft reset clears electronic glitches in the ice maker’s control module and forces it to run through a fresh production cycle. This step is particularly effective on modern refrigerators from LG, Samsung, and GE that use electronic control boards rather than simple mechanical timers.
Most ice maker modules have a test or reset button located on the front face or underside of the module inside the freezer. Press and hold it for three to five seconds. You should hear the ice maker motor engage and run through a test cycle. If water fills the mold and completes the cycle, the reset worked.
If your model does not have a visible reset button, you can perform a full power reset by unplugging the refrigerator from the wall outlet for 5 to 10 minutes and then plugging it back in. Allow 24 hours for full ice production to resume after a reset.
Ice Maker Making Ice But Not Dispensing
Sometimes the ice maker is producing ice perfectly fine, but nothing comes out of the dispenser. This is a separate problem from the ice maker itself not working.
The most common cause is ice jamming in the dispenser chute. Crushed ice and small fragments can melt slightly and refreeze into a solid mass inside the chute. You can clear this manually with a wooden spoon or plastic utensil. Never use a metal object inside the dispenser chute, as this can damage the auger mechanism.
Another possibility is a faulty auger motor. The auger is a rotating spiral mechanism inside the ice bin that pushes ice toward the chute. If the motor driving it has failed, you will hear nothing or a weak hum when pressing the dispenser paddle. This repair typically requires replacing the auger motor assembly, a task best left to a qualified technician unless you are experienced with appliance repair.
Ice Maker Producing Small, Hollow, or Cloudy Ice Cubes
If your ice maker is working but the cubes are smaller than normal, hollow in the center, or have a cloudy or white appearance, restricted water flow is almost always the cause. This usually points to a clogged water filter, low water pressure, or a partially blocked water inlet valve.
Replace the filter first, as it is the cheapest and simplest solution. If the problem persists, check the water inlet valve and home water pressure. Mineral deposits in the water can also cause white, opaque ice, which is not a mechanical problem at all but rather a water quality issue that can be addressed with a filtration upgrade.
When to Call a Professional Appliance Repair Technician
DIY troubleshooting handles the majority of ice maker problems. However, there are specific situations where professional service is the right call.
If the ice maker module itself is defective, meaning the motor, thermostat, timing components, or control board within the unit has failed, replacement of the entire ice maker assembly is usually necessary. This requires correctly identifying the part number for your specific model and correctly wiring and mounting the new unit.
Persistent refrigerant issues causing the freezer to not reach proper temperature, significant water leaks around or beneath the refrigerator, electrical faults involving the main control board, and any repair on a refrigerator still under warranty should all be handled by a certified appliance technician.
Attempting complex repairs on a refrigerator that is under manufacturer warranty without authorization can also void the remaining warranty coverage, so check your documentation first.
Preventive Maintenance to Keep Your Ice Maker Running

Taking a few simple steps regularly can prevent the most common ice maker failures before they happen.
Replace the water filter every six months without exception. Set a reminder on your phone if that helps. Keep the freezer temperature consistently between 0 and 5 degrees Fahrenheit. Avoid pushing the refrigerator too tightly against the wall, which can crimp the water line and restrict airflow around the condenser coils. Clean the ice bin every few months by removing it and washing it with warm soapy water, then rinsing and drying completely before reinstalling. If you notice the ice developing an off smell or taste, discard the entire bin of ice and let the maker produce a fresh batch. Do not overfill your freezer to the point that air circulation around the ice maker is blocked.
👉🏻Discover More About Unique Appliance Problems[ How Long Should a Refrigerator Last ]
FAQs: Refrigerator Ice Maker Stopped Working
How long does it take for an ice maker to start working again after a repair?
After fixing the underlying issue, most ice makers need between 6 and 24 hours to resume full ice production. The first batch of ice after a repair or reset may be smaller than usual, which is completely normal.
Why is my ice maker running but not producing any ice?
If you can hear the ice maker cycling but no ice is being made, the most likely cause is a frozen water supply line. The motor runs through its cycle but no water enters the mold. Thawing the fill tube usually resolves this quickly.
Can a bad water filter stop an ice maker from working?
Yes, absolutely. A severely clogged filter restricts water flow to the point where the mold cannot fill properly. Replacing the filter every six months prevents this from becoming a problem.
How do I know if my water inlet valve is bad?
If the filter is new, the water line is clear and not frozen, the water pressure at home is normal, but still no water reaches the ice maker, the inlet valve is the likely culprit. A multimeter test of the solenoid coil can confirm electrical failure. You can also visually inspect the valve screen for mineral buildup.
Why did my ice maker stop working after I replaced the water filter?
This is a common occurrence and usually means air is trapped in the line. Run 2 to 3 gallons of water through the door dispenser to purge the air and prime the new filter. Ice production should resume within a few hours.
Is it worth repairing an old ice maker or should I replace it?
If the refrigerator itself is relatively new and in good condition, repairing or replacing the ice maker module is almost always cost-effective. A replacement ice maker assembly for most brands costs between $50 and $150 in parts. If the refrigerator is more than 15 years old and has multiple issues, the economics of full unit replacement may be worth considering.
Why does my ice maker keep freezing up?
Repeated freezing of the fill tube usually means the freezer temperature is set too low, causing water to freeze before it fully enters the mold, or there is a defrost system issue allowing frost to build up excessively around the ice maker components.
Can I use my refrigerator without the ice maker connected?
Yes, you can. If the ice maker is malfunctioning and you are waiting on parts or a technician, simply turn it off to prevent any further water leaks or operational noise while it sits unused.
Conclusion
A refrigerator ice maker that stops working is almost always fixable at home, and the process of narrowing down the cause is genuinely straightforward once you know what to look at. From a simple switch being toggled accidentally to a clogged water filter or a frozen supply line, the vast majority of ice maker failures fall into a small category of common, manageable issues. Working through the steps outlined in this guide systematically saves both time and money before reaching out to a repair service.
If after going through every step the ice maker still refuses to produce ice, the assembly itself may have reached the end of its service life. At that point, replacing the ice maker module is a reasonable, affordable repair that most handy homeowners can complete in under an hour. Staying on top of filter replacements, temperature settings, and occasional cleaning will keep your ice maker running reliably for years to come.